# Quickstart

Create your Agent

1. Click "Create Agent" on the landing page. You can also log in by clicking the dashboard button on the top bar.

<figure><img src="https://1564339561-files.gitbook.io/~/files/v0/b/gitbook-x-prod.appspot.com/o/spaces%2F4ACq9dLUMhAWYvqkMngk%2Fuploads%2Fiy9dSx6O7de2vhMEvhhp%2Fimage.png?alt=media&#x26;token=adccaad7-f022-4fd7-885b-6f92a5d2186f" alt=""><figcaption></figcaption></figure>

2. Log in if needed

<figure><img src="https://1564339561-files.gitbook.io/~/files/v0/b/gitbook-x-prod.appspot.com/o/spaces%2F4ACq9dLUMhAWYvqkMngk%2Fuploads%2FRYojZ8XchsRgcWXQcfRP%2Fimage.png?alt=media&#x26;token=22c1893b-5113-4498-8c55-49aca05568f1" alt=""><figcaption></figcaption></figure>

3. Enter the name of your agent. This can be changed later.

<figure><img src="https://1564339561-files.gitbook.io/~/files/v0/b/gitbook-x-prod.appspot.com/o/spaces%2F4ACq9dLUMhAWYvqkMngk%2Fuploads%2FEZQrnDpdRZ15n9axmrMi%2Fimage.png?alt=media&#x26;token=34e66aa1-3e96-446a-ae51-044c4836bb00" alt=""><figcaption></figcaption></figure>

4. Click `Create Agent` at the bottom&#x20;

<figure><img src="https://1564339561-files.gitbook.io/~/files/v0/b/gitbook-x-prod.appspot.com/o/spaces%2F4ACq9dLUMhAWYvqkMngk%2Fuploads%2FCepdsCFPFrvylM2hzvx4%2Fimage.png?alt=media&#x26;token=9c26cd85-ff73-4d85-88df-af58ef24f340" alt=""><figcaption></figcaption></figure>

4. This will direct you to the agent overview page. Let's start by creating an image generation command. Click on the `Content Generation` link in the sidebar menu.

<figure><img src="https://1564339561-files.gitbook.io/~/files/v0/b/gitbook-x-prod.appspot.com/o/spaces%2F4ACq9dLUMhAWYvqkMngk%2Fuploads%2FMUQBPzKke5kQtfCJEzfh%2Fimage.png?alt=media&#x26;token=20123d88-5208-438a-a9a2-2b4c3b1d83e4" alt=""><figcaption></figcaption></figure>

5. Click "Create Command".

<figure><img src="https://1564339561-files.gitbook.io/~/files/v0/b/gitbook-x-prod.appspot.com/o/spaces%2F4ACq9dLUMhAWYvqkMngk%2Fuploads%2FeIn5QbcIlP5EIcnAyRD6%2Fimage.png?alt=media&#x26;token=6dfec55d-278b-4a05-8ee8-b72e8dd92bce" alt=""><figcaption></figcaption></figure>

6. For this tutorial, we'll be using **Image To Image** generation. Select Image To Image.

<figure><img src="https://1564339561-files.gitbook.io/~/files/v0/b/gitbook-x-prod.appspot.com/o/spaces%2F4ACq9dLUMhAWYvqkMngk%2Fuploads%2FFf6SigAjBxQTm7YwAeae%2Fimage.png?alt=media&#x26;token=6964aeb7-ab53-4242-904d-3959d36f4baf" alt=""><figcaption></figcaption></figure>

{% hint style="info" %}
**Image To Image** generation transforms one existing image into new images, by applying a text prompt to modify the features and style of the original image while preserving its basic structure, essentially allowing you to "reimagine" an image based on your desired changes.
{% endhint %}

7. Choose a name for the command. This allows you to invoke commands directly by typing `!command_name` in a chat room where the agent is listening. This also applies to Tweets that tag the AI.

<figure><img src="https://1564339561-files.gitbook.io/~/files/v0/b/gitbook-x-prod.appspot.com/o/spaces%2F4ACq9dLUMhAWYvqkMngk%2Fuploads%2F6lUYZpJhtdNQepZfFEoW%2Fimage.png?alt=media&#x26;token=3ac87dc1-0de0-4e4d-9b46-563f2ccbe0fb" alt=""><figcaption><p>
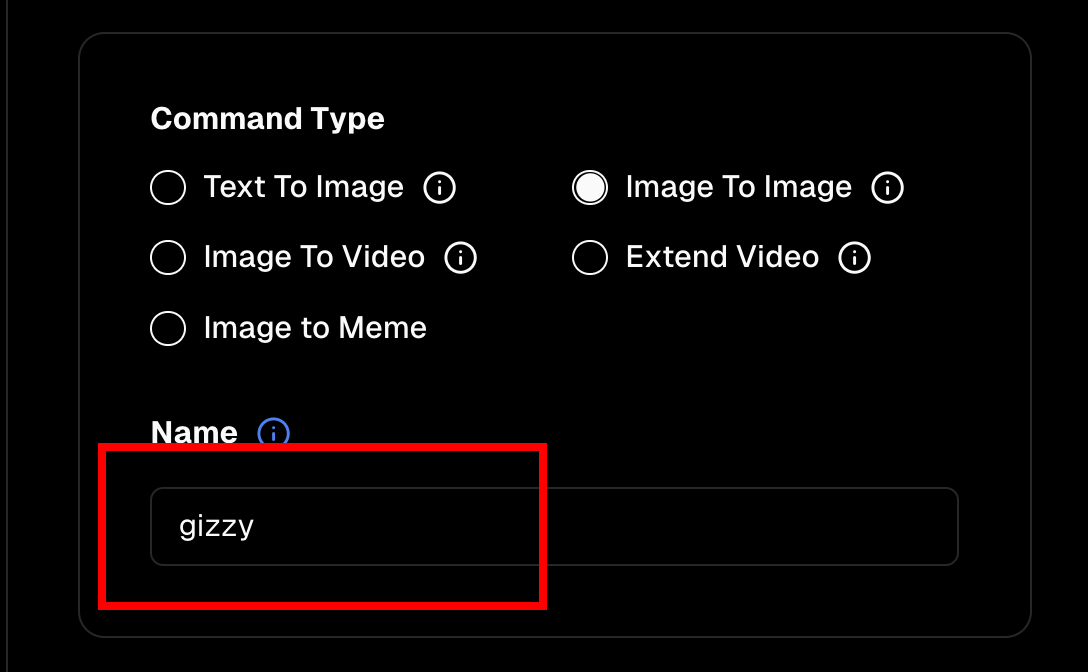
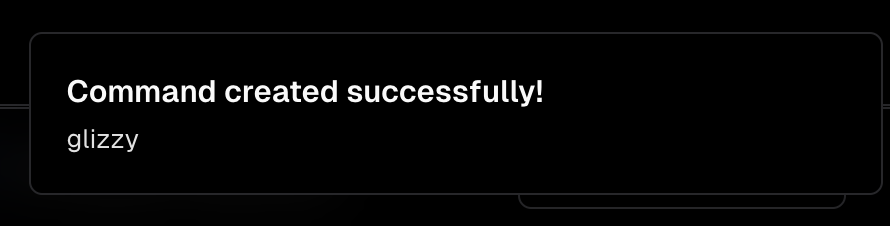
Invoking this command can be done by typing <code>!glizzy &#x3C;prompt></code> into the Webring.AI live chat.</p></figcaption></figure>

7. Upload an input image to use for the base. Images with clearly defined backgrounds and foregrounds work best. See [`Image to Image`](https://radbro-webring.gitbook.io/webringai/media-generation/image-to-image) for more detailed description of how to create and select images for image-to-image generation.

<figure><img src="https://1564339561-files.gitbook.io/~/files/v0/b/gitbook-x-prod.appspot.com/o/spaces%2F4ACq9dLUMhAWYvqkMngk%2Fuploads%2FL7XF4TB1cqAMVg4JYg0d%2Fimage.png?alt=media&#x26;token=5165a60c-55be-4cc8-9981-02b511abbd64" alt=""><figcaption></figcaption></figure>

8. Click the upload icon.

<figure><img src="https://1564339561-files.gitbook.io/~/files/v0/b/gitbook-x-prod.appspot.com/o/spaces%2F4ACq9dLUMhAWYvqkMngk%2Fuploads%2FEC3TKzyfZplxZsxCa4Al%2Fimage.png?alt=media&#x26;token=a975fdf8-b993-488f-8c18-9a9949437994" alt=""><figcaption></figcaption></figure>

8. Select the uploaded image for the command.

<figure><img src="https://1564339561-files.gitbook.io/~/files/v0/b/gitbook-x-prod.appspot.com/o/spaces%2F4ACq9dLUMhAWYvqkMngk%2Fuploads%2FIPLY1t1olepwVqjSQyOk%2Fimage.png?alt=media&#x26;token=18eefa0f-d547-4cd7-bfc6-fa9e8c2fb7a0" alt=""><figcaption></figcaption></figure>

9. Select a model to use for generation. A few pointers on the models:

<figure><img src="https://1564339561-files.gitbook.io/~/files/v0/b/gitbook-x-prod.appspot.com/o/spaces%2F4ACq9dLUMhAWYvqkMngk%2Fuploads%2FKPdDR1Um2XTWLaIDg7ZF%2Fimage.png?alt=media&#x26;token=03ff0a6d-24c9-446e-8400-e83ac9b48396" alt=""><figcaption></figcaption></figure>

{% hint style="info" %}
**Available Img2Img Models**

* **Radsnail Diffusion** - Good general purpose model. Swiss army knife of image generation models. Results are heavily dependent on user prompt.
* **Anime XL** - Good for generating anime, drawings, and 3D.
* **UltraRealism HD** - designed for photorealism.
  {% endhint %}

10. Click `Create Command` at the bottom.

<figure><img src="https://1564339561-files.gitbook.io/~/files/v0/b/gitbook-x-prod.appspot.com/o/spaces%2F4ACq9dLUMhAWYvqkMngk%2Fuploads%2FdP9ByKZwTF7ueAIY1wQn%2Fimage.png?alt=media&#x26;token=c2b234d4-d8e4-4e07-a873-e20bb8efb386" alt=""><figcaption></figcaption></figure>

11. You should see the Command created successfully toast pop up.

<figure><img src="https://1564339561-files.gitbook.io/~/files/v0/b/gitbook-x-prod.appspot.com/o/spaces%2F4ACq9dLUMhAWYvqkMngk%2Fuploads%2F5Gm8v8GdgHTFadRt2PRc%2Fimage.png?alt=media&#x26;token=79c71d3b-f036-4b79-9126-1e2c19b0f230" alt=""><figcaption></figcaption></figure>

12. Now let's connect our Agent to telegram. Let's open the `Socials` tab in the Dashboard.

<figure><img src="https://1564339561-files.gitbook.io/~/files/v0/b/gitbook-x-prod.appspot.com/o/spaces%2F4ACq9dLUMhAWYvqkMngk%2Fuploads%2FXVvjmKh0Y2vNvkThRVOf%2Fimage.png?alt=media&#x26;token=bd6aa061-0aca-4bdc-b259-309ae4da5307" alt=""><figcaption></figcaption></figure>

13. Now we need to create a Telegram bot and get a copy of its API token. Message <https://t.me/BotFather> to create a new Telegram bot.

<figure><img src="https://1564339561-files.gitbook.io/~/files/v0/b/gitbook-x-prod.appspot.com/o/spaces%2F4ACq9dLUMhAWYvqkMngk%2Fuploads%2FsKoBLHHLv4oONw27AuTb%2Fimage.png?alt=media&#x26;token=9c0fb33a-4c0b-4eab-a6df-b4b06c950d3d" alt=""><figcaption></figcaption></figure>

13. Create a new bot with `/newbot`.  The name you give your bot does not need to match the name you gave it on Webring.AI but it we recommend keeping consistency as a best practice. You can always update the name of your Webring.AI bot as needed.&#x20;

<figure><img src="https://1564339561-files.gitbook.io/~/files/v0/b/gitbook-x-prod.appspot.com/o/spaces%2F4ACq9dLUMhAWYvqkMngk%2Fuploads%2FhNgKTeRGNZNv6qMnZR4V%2Fimage.png?alt=media&#x26;token=be4c8e0b-242f-4303-87e5-dc4559221f67" alt=""><figcaption><p>
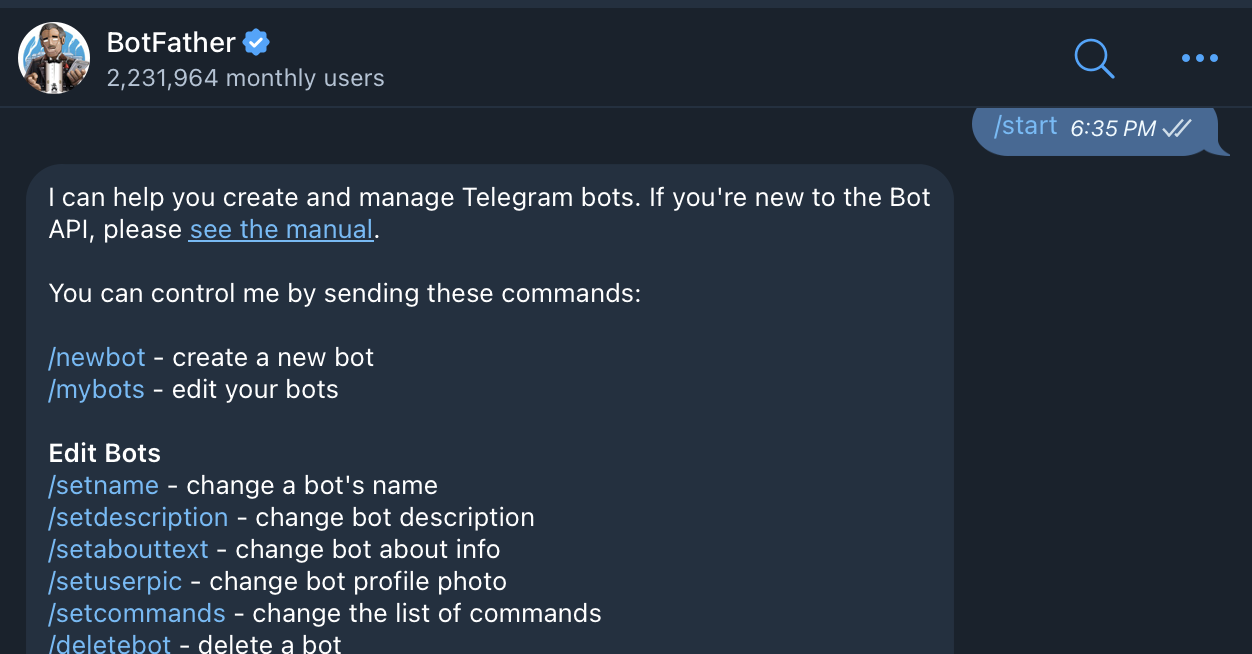
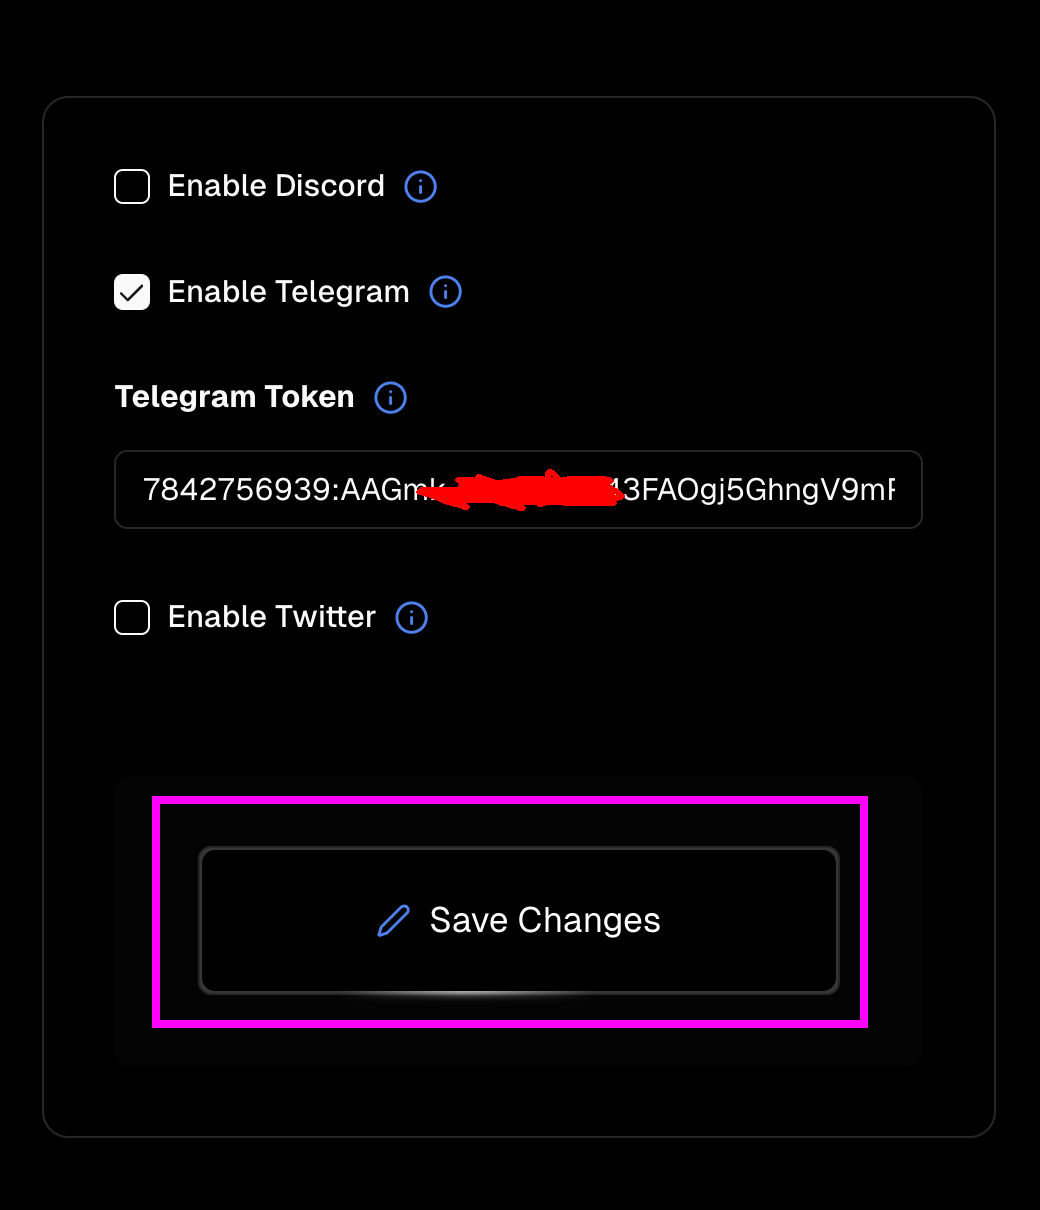
Once your bot is created, copy the token displayed next to "Use this token to access the HTTP API". </p></figcaption></figure>

14. Go back to the `Socials` page and click `Enable Telegram`. Then Paste the token into the `Telegram Token` input.

<figure><img src="https://1564339561-files.gitbook.io/~/files/v0/b/gitbook-x-prod.appspot.com/o/spaces%2F4ACq9dLUMhAWYvqkMngk%2Fuploads%2F9W8oTVNQSbTay8DXY47V%2Fimage.png?alt=media&#x26;token=266786b3-90dd-4ff7-a6ca-07ebbff15947" alt=""><figcaption></figcaption></figure>

15. Click `Save Changes.`

<figure><img src="https://1564339561-files.gitbook.io/~/files/v0/b/gitbook-x-prod.appspot.com/o/spaces%2F4ACq9dLUMhAWYvqkMngk%2Fuploads%2FMtnZ0rbLHs0TUAXksJ2c%2Fimage.png?alt=media&#x26;token=ff7a6060-751e-4c5e-b9c7-42660c838b2c" alt=""><figcaption></figcaption></figure>

15. Now let's start the bot. Click on <mark style="color:green;">**Start Agent**</mark> on the sidebar menu.

<figure><img src="https://1564339561-files.gitbook.io/~/files/v0/b/gitbook-x-prod.appspot.com/o/spaces%2F4ACq9dLUMhAWYvqkMngk%2Fuploads%2F1FrMKMrild12gEUK52sf%2Fimage.png?alt=media&#x26;token=1a20d70a-fcc5-4691-9d8b-0d0041cdbf2f" alt=""><figcaption></figcaption></figure>

{% hint style="info" %}
Note: You should have 25 free credits just from signing up for Webring.AI. Webring.AI charges credits to keep bots running as well as for each image and video generated. See [Add Credits](https://radbro-webring.gitbook.io/webringai/credits-and-pricing/pricing) to learn how to add credits to your account. See [Pricing](https://radbro-webring.gitbook.io/webringai/credits-and-pricing/pricing) to learn how credits get spent when using Webring.AI
{% endhint %}

16. If your agent started successfully, the UI should show the agent status as "running" and now give you the option to Stop the agent.

<figure><img src="https://1564339561-files.gitbook.io/~/files/v0/b/gitbook-x-prod.appspot.com/o/spaces%2F4ACq9dLUMhAWYvqkMngk%2Fuploads%2Fuge5pHkwlx22mCLxDehF%2Fimage.png?alt=media&#x26;token=d908572f-f35e-4b8b-acb4-4d1019d3f1e5" alt=""><figcaption></figcaption></figure>

17. Now head back to Telegram and try messaging your bot with the command and a prompt to run.

<figure><img src="https://1564339561-files.gitbook.io/~/files/v0/b/gitbook-x-prod.appspot.com/o/spaces%2F4ACq9dLUMhAWYvqkMngk%2Fuploads%2F2LPZki4OaMjUGB3jj7b0%2Fimage.png?alt=media&#x26;token=5a864a82-6d06-4661-83b9-154fa1f5dda6" alt=""><figcaption></figcaption></figure>

Congrats! You just set up your first Webring.AI Agent. Continue exploring the documentation to leverage the full set of capabilities out of your bot.

<table data-view="cards"><thead><tr><th></th><th></th><th></th><th data-hidden data-card-target data-type="content-ref"></th></tr></thead><tbody><tr><td>Configure Video Generation</td><td></td><td></td><td><a href="../media-generation/image-to-video">image-to-video</a></td></tr><tr><td>Configure Agents for Chat &#x26; Posting</td><td></td><td></td><td><a href="../posts-and-messaging/chat-and-posting">chat-and-posting</a></td></tr><tr><td></td><td>Adding Credits</td><td></td><td><a href="../credits-and-pricing">credits-and-pricing</a></td></tr><tr><td>Connect Agents to Twitter</td><td></td><td></td><td><a href="../posts-and-messaging/connect-agents-to-twitter">connect-agents-to-twitter</a></td></tr></tbody></table>
